Monday, February 18, 2013

ATC Club-Feb 2013

Good Morning Bloggers, I'm off today for the President's Holiday so I was finishing up my ATC's for the month of Feb.  Our club meets tonight so though that was maybe a good idea, huh? 

Had a busy weekend or rather a busy Saturday.  My daughter was wanting to move back to Tampa so I drove to Valparaiso (sure just when I learned how to spell the name of the town she lived in, lol) Saturday morning leaving at about 5 a.m.  It's a 7 hour drive one way.  Got there about noon (11 her time) and packed up my little truck to the point of bursting at the seams so we had to put a few things on the roof and tie it down with a tarp.  We even had to leave some things behind.  Then we drove straight back.  Got back to Brandon about 10 p.m. and had to unload the truck in to my nephew's house where is going to be staying for a while and then drove back to Largo.  Got home Saturday night about 11:30 p.m and went straight to bed, I was pooped!!!

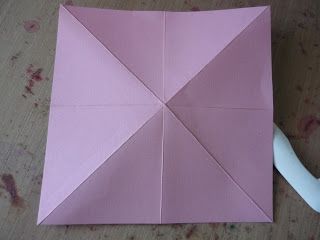
So yesterday, I kinda layed around.  Did make a few of the hearts and some of the beaded handles while I was lounging but was able to get the remainder of them done this morning.  The hearts started as a 6x6 sheet of cardstock.  It was folded in half both way and them diagonally both ways.

                                      Then it was folded in a diamond shape and then in half.
      Then I cut it like I was cutting a heart out of a folded piece of paper.  Only difference is you are       cutting six layers so be sure and have your trusty heavy duty Tim Holtz scissors handy.

This is what you will have when you open it out.  A four leaf clover, a pink one, lol!
 Next take the two sides that have an 'x' on them and put them back to back
                                                           and squeeze them together.
 
 
                                             Then I stapled each side with the tiny-attacher.
     and punched a hole in the center four layers with a hole punch, I think this one was the 1/2 " one.
 I then inked all the edges and decorated them up with a bunch of little punched hearts.
I added a beaded handle made with some twine to each one.  And because there is no back side so to speak, I added my ATC information as a clear label inside one of the cones.
Here is the whole bunch of them together.  They certainly turned out better than I thought they would, how fun!!
 So now that Valentine's Day is over, you have a cute little treat holder to make for next year, lol!
Hope you had a very nice Valentine's Day and hugs and kisses to you all!
~Jody
Friday, February 8, 2013

Happy Valentine's

Hey there bloggers, hope all is well in your realm.  I have a Valentine's tag to share with you today.  I kinda followed Tim's tag for Feb 2013 but it kinda took on a life of it's own and here's the end result.

The lacy piece underneath is part of a doily, then the negative burlap heart piece with Festive Berry inked edges.  Added the negative red felt heart (which is my favorite part) and then the regular heart at the top.  The two red felt hearts I inked with Black Soot.  Added some Black Soot around the edges a bit too as well as some Vintage Photo.  The twine that is holding the cash key is actually red and white but it's really lightly colored and you can hardly see it.

I used the new lightbox to take the photo and I think it makes the tag looked washed out.  I am going to see about getting a darker background for it this weekend and take some more photos.  Any other ideas that I can put in the lightbox that will help with that?

Thanks for stopping by today, hope you have a great Friday and an even better weekend!
Hugs,
~Jody

Saturday, February 2, 2013

I finally did it..............

I made myself a Lightbox, yea, no more crappy photos, lol.  Since I do most of my crafting and stuff in the evenings, it is too dark, of course, to take photos.  I have tried several spots in my house, usually those where I have Ott-Lites.  But, from what I've seen, there is no match for a light box.  I found a tutorial online that showed how to make it for just pennies, 200 pennies to be exact, for me anyway.  I spent $1 on three pieces of poster board and $1 on a white plastic tablecloth (the disposable kind).  I got a box from work, as square as I could find.  I cut the sides out of it leaving a 2" border on all sides.  Then I cut 16 2" pieces of poster board the same height as the box and covered all the insides.  I used spray adhesive but you could use anything.  Then I cut a bigger piece of poster board to go from one side inside at the bottom all the way up the other side to the top, so there's a slope in it.  Then I covered each outside 'window' with the plastic tablecloth (doubled it) cut to size using regular packing tape.  Then I covered the top.  Add a light to the top of it and this is what you get.

This is what it looks like with the light off.
 And with the light one.

And this is the same card (I made a few different versions of the same card) that I posted about last post.  Can you tell a difference?


I have to admit there are some qualities that I like in the non-lightbox photo but I can definitely see an advantage to using a lightbox.  Guess I will just have to play with it and see what I can make it do for me.  Do you use a lightbox for taking your photos or do you try to stick to natural light?

Hope you have a fabulous weekend, thanks for stopping by!
Hugs,
~Jody