Saturday, January 14, 2017

Angels from above

A few months before Christmas, someone discarded a three pronged fan light at the dumpster out back of my place.  All three globes were there and in good shape so I grabbed them thinking I would use them for some of our outside lights as ours didn't have any.  Sadly, they did not fit as the mouths were too small.  They became abandoned in the garage...............

UNTIL we had a Secret Santa party at work a few days before Christmas and one of the gals had made an angel out of a fan light globe. OMG it was the cutest thing I think I have ever seen.  She used a glass ornament on top of it and some tinsel around the neck and a pipe cleaner for the halo.

Well, you know me..................

I just had to try my hand at that, especially since I had three globes just sitting in my garage waiting to be crafted upon.

So..............I gathered all the Christmas tinsel and ribbon I could find and set to work.  This is my finished masterpiece


Is that not the cutest thing you have ever seen? 


You can add a battery operated tea light underneath as well.

I ended up making a few others too, just couldn't stop myself, lol


 It was late in the season when I stumbled upon these beauties but I will be remembering them come next season, for sure!!!

Hugs,
~Jody

Saturday, August 13, 2016

Anyone one still there?

Hey there bloggers, long time no see.  Have been busy this summer working, out of state.  Actually commuting to CO everyday but I really like my new job.  Will probably move down there one day but not ready just yet.

I have recently gotten in to woodworking as well.  Made a little table to set my bbq'er on, on my little balcony.  I'll share a picture of it later.

The latest thing that has caught my eye is this bench made out of a headboard and a footboard.


And I found a headboard and footboard at a garage sale last weekend for $10.  And it's pretty much just like this one.  The lady said it was a twin size but I believe it is a full size but either way it should work.


I have already cut the footboard in half


I have altered it a bit more today, trying to make it fit the headboard where I want it to and where it will best fit, round parts to square parts, if you get my meaning, lol!   I haven't taken any pictures of that yet but I will tomorrow probably.  I will be out there working on it tomorrow anyway.  I'll keep you posted.

(Update: Finally got the photos to upload properly, not sure what that was about but they are there now so..............Enjoy!

Hugs,
Jody

Friday, February 26, 2016

Navy Blue

So I've had these navy blue pants cut out to be sewn up for about two months now and yesterday I decided I would get them made up.  Took me about two hours and I had them done. It is a simple pajama pant pattern that I have altered to fit me perfectly and I make them out of suiting fabric.  They look just like suit pants when I'm done and they are so comfortable, I just love them.

Anyway, I had a navy blue and white blouse to wear with them but no jewelry so I decided to make some.  I found a few different blue beads at the store but I think the ones I got matched the best.

(No flash)
 See what you think?

(Flash)
I think they match pretty well myself.  Can't wait to wear them together.


Wednesday, February 17, 2016

Valentine's Day Tea Party

We had a lovely new (well kinda) tea room that opened up here last April.  We had a friends birthday tea party there the end of last April but this year we did a Valentine's Day Tea Party there and it was FABULOUS.  The owner had it decorated up a bit and we all brought a little valentine for each person.  It was so much fun.  I get right in to tea parties like this.
I made myself a heart necklace and earring set.
I bought a red hat at a flea market here in town to wear.  I cleaned it all up with a lint removed and a damp cloth.  It was pretty dusty.

Then I went to Hobby Lobby and bought a red feather, a sparkly butterfly, some red flowers and some other little feathers and decorated the hat to my liking.  It fit beautifully and looked amazing. Everyone just loved my new red hat!!!

I had a red dress in the closet that hadn't been worn for a long time.  It matched my hat and jewelry just perfectly!

This is Wanda.  She is the owner, along with her husband, Jim. She was also our waitress/hostess and what a lovely lady she is, so gracious and elegant. 
This picture is a bit blurry but I think you can make it out ok.  We had chicken salad croissants and cucumber/dill sandwiches.  Chocolate brownies, mini doughnuts and pink velvet cupcakes were on the second tier.  On the top tier was fruit cups and cream filled strawberries.  We also had scones, which she brought out first on a separate plate, WARM, yum!   
This is Joann.  I met her through Shirley at a Bronco party.  Her and Shirley have been friends for years.  I actually knew her son Greg when I was growing up but didn't know she was his mother until we started talking one day at one of our football parties. What a small world.
This is my friend Joyce.  I graduated from high school with her.  I met up with her again when I worked for the County.  She is a great friend and I so enjoy her company. 

This is Marva, my mother.  She looked so pretty in her red sweater.  She just turned 80 in January. Was glad she was able to attend the tea with us.

This is my friend Shirley.  I have known her for several years.  I met her when I worked at the DOT
 years and years ago.  She will turn 80 in April.  I see another tea party in the making. She bought her hat at the same flea market the same day I got mine and she got a matching purse too.


We all brought little valentine presents for each person, this was mine.  I filled them with Valentine's Day M&M's.  Joann made sugar cookies for everyone, YUM, Joyce brought us each a coffee mug with a little plush teddy bear inside, my mother brought a little goody bag with a heart shaped pencil sharpener (that works really well, I might add) and a heart decorated rubik's cube, so cute, and Shirley brought each of us a box of flower seeds.  Can hardly wait for spring so I can plant them!!


We had such a great time. The food was fabulous an the tea even better.  I had Bourbon Street Vanilla.  It was a decaffeinated roobis tea and it was so good.  
So Valentine's Day has come and gone again for another year but what a great time we had.  I hope you had a great one as well.

Hugs,
~Jody

Friday, February 5, 2016

Mooooore Valentine's Day 2016

Not sure why but I have been super motivated this year with some V-day projects.  Still have one I want to finish before the big day but here's a few I have been working on............ oh and I want to give Tim's tag a try too.

The first one I made, even before the little matchboxes, was a new canvas for the 'infamous' picture frame I have that hangs beside my front door.  You may remember it...............it's the one I have been making different canvases for, for each season. I think I started with a Halloween theme so still have about a half a year to go.

Anyway, here's the one I did for Valentine's Day.

Not sure if I like this one or not, it seems to be missing something.  I used just all scraps that I found in my stash of collectibles, lol.  I seem to have a fetish for charms and things that dangle. 

I found this heart in my collection so I added a few more beads and such and then used one of Tim's pins to hold it on there.  I had to actually pierce it thru the chipboard though as the bottom heart, the big one, is encased in silver or some type of heavy metal and it is heavy.  I had originally attached it with some glue dots and it kept falling off............so, I got tired of that and had to man handle it to get it pinned through the chipboard but I was successful.

The word valentines was cut from my Cricut years ago out of shrink film.  Don't remember the actual project  I made it for but after I shrunk it, it was too small.  Therefore, it was deposited in little file drawer that holds all the other rejects, or save for another day trinkets.   Anyway, today it was salvaged and put to good use, and it was the perfect size.

The brown speckles in the middle of the canvas were done with some embossing paste that I colored vintage photo with a drop of reinker and the new stencil I received as part of the gift I won from the 12 tags of 2015-Christmas.  I wanted to match the browns in the ribbon and the '14' wooden letterpress numbers.  I think I should have added a bit more or maybe not quite so much right in the middle as it kinda looked like dog shit when I got done.  TOO late now, lol.  I just tried to find some other things to cover some of it up with, lol.  And the 'love' metal piece I added some red tulle to each side.

I added an eye screw to the bottom of the 4 and hung the word 'heart' and put a little bling on it.  I think it still needs something though.  I think I may add a spot of red paint to the top of the 14, it may add something.

My embossing techniques still need a little work but I won't give up. On to bigger and better things.

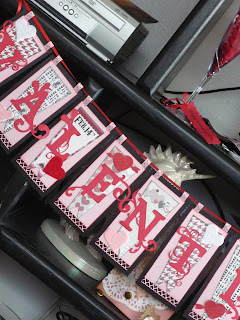
Another project I have been working on is a banner to display in my living room.  A few years ago I came across a sheet of cardstock that had these little Valentine flags on it.

They were perforated around all edges and I just really liked them.  Have not any idea what the brand name was because I punched them all out and threw away the negative side and then never did anything with them. I decided I wanted to make this banner and when I went searching for some ideas, I found them in my stash.

There were only five designs and the word 'valentines' has 10 digits so I needed two of each design.  I scanned them in to my computer and printed out another sheet of them on white cardstock.  The colors are not spot on but once they were incorporated in to my design, no one would be able to tell.

I started with a black background which I cut around each with a decorative pair of scissors-pinking, it was called.  Then I went for pink.  On this layer I used a Martha Stewart heart punch across the bottom and I inked all the edges with festive berry distress ink.  I then inked all the edges of the flags with black soot and added those as my next layer.

Then I went to my Cricut cartridges to try and find a font I liked.  Found one so then it was on to the correct size.  Started with 4" and that was way too big..................ended up with 2 1/2".  Inked those with festive berry distress ink.  Now, how to hang it???

Went to Pinterest to look at some different ideas on how to hang a banner and found a cute idea where it looked like they added a couple of strips of ribbon to each side on the top and then strung another one through the loops.  I liked it so I tried the same thing................and it worked.  Love the results.


I also found some adhesive backed felt hearts in my stash, 10 of them exactly, so I added one to each flag.

I cut each ribbon loop to approx. 1 3/4" and folded them in half.  I slipped them over the edge of the black and under the pink layer just enough to attach them with the tiny'tacher stapler.  Worked perfectly!!

Just love how it turned out.  This will be one decor item that will be brought out each year for years to come.

Have one more little project that I wanted to share but this post is pretty long already so I will save it for another day.

Hope you have a great day,
Hugs,
~Jody
 

Monday, January 25, 2016

Valentine's Day 2016

Good morning peeps, looks like it's getting to be about Valentine's Day.  I love making little gift holders or just something little to put little candies in.  Just recently I picked up the matchbox steel rule die at a LSS (as local as it gets around here anyway, which is 50 miles down the road in Ft. Collins, CO).  Anyway, I was dying to give it a try so I grabbed a piece of cardstock that was just laying on my craftroom table, it happened to be red, and I die cut the matchbox and assembled it.  So dang cute.

 I had also been cutting out some hearts for some cards and so I had the movers and shapers hearts laying out.  Inside the matchbox die is a little square magnetic piece that can be removed so I took it out and added the smallest heart and cut another one with pink this time.  OMG, did it turn out so dang cute.

I also found in my stash a piece of like mauve vellum so I covered the heart from the inside with that and it made the cutest little box.  See what you think........

I added a little bow and a small sticky heart and I am going to fill them with pink M & M's.  I'll pick some up at the store next time I'm there.  Aren't they adorable???


I also made a card too.....


 I started with a black base and found some cream/black paisley cardstock in my stash so I put that down next after inking the edges, of course.  Then I cut out some pink hearts and inked them with black on the outside edges too. I wrapped a dark pink ribbon around the paisley cardstock before I glued it down.  Then I added the big heart first and then the smaller heart with a pop dot to give it some dimension.  I had some different ribbon that had words on it so I cut out one and glued it to the dark pink ribbon.  Then I made a little bow out of some sheer pink ribbon and added it to the small heart.

On the inside I glued a black heart that had been embossed with pink words (from a project a few years back) to a pink heart that I had traced around the scalloped heart spellbinders die and just cut it straight instead of cutting the scallops.  Then I die cut the 'hugs & kisses' from one of Tim's decorative strip dies and inked the edges black as well.  I found some pink bling in my stash as well so I added that to the bottom. Not sure I liked that but by that time it was stuck, lol.  I then used a small pink heart with which to sign my name.

Well I have a few more cards to make so better get started.  I am pretty on top of it this year so I may come up with some others before it's over.  Hope you all have a great day and thanks for checking me out.
Hugs,
~Jody

Sunday, January 3, 2016

Winner, winner, winner..............


YEA, I won!

My tag for December 2015 won over on Tim's blog. WooHoo.  Soooooooooo excited to see what special prize they will send me.

Here's another look at the tag.............

Thank you Tim for selecting my tag and Thank you Mario for seeing that my prize gets put in the mail (most importantly, lol).  AND Thank all of YOU for looking at my tag and for all the great comments, just love hearing from you. Looks like 2016 is off to a grrrreat start.

Hugs,
~Jody

Thursday, December 24, 2015

Noel

 Have been wanting to make one of these signs for a long time. I purchased a 1x8x10 that was on the clearance rack and had them cut it down to 6'.  Then I sanded down the edges to deter any stickers. I wanted it to be a soft muted blue color so I used white acrylic paint and added some military blue to it and also some black.  I painted both sides and then kinda slapped the paintbrush around to give it some texture.


Then I printed out the letters on my printer at like a size of 770. Then I went around the outline on the back with a dark lead pencil.  I placed each one on the board about 1 1/2 inches apart and outlined each letter. I then painted each one with just white paint.  When dry I outlined each letter with a fine black marker.

 Then I tore apart an old wreath I had in my stash.  I hot glued some of the branches to the top and sides above the 'N'.  I added a good sized red bow and a gold bell that was tied with another little red bow.  I hot glued them on as well.  The I added another little patch of branches as the bottom below the 'L' and added another gold bell.

 Then I found a few small pinecones laying around my house and thought they added that last little touch it needed.

So cute....................for the first one.  There are a few things I would do different but those will have to wait for next time.

Hope you are having a great holiday season!
Hugs,
~Jody


Wednesday, December 16, 2015

Christmas Cards

Hi All,

Just wanted to show you another take on Tim's December tag.  I actually used his inspiration for my Christmas cards this year with a little twist.  I used his lamppost die for my center piece instead of the wreath and I used some rusted metal snowflakes instead of the star.  Well I started with some rusted metal snowflakes but realized early on that I didn't have enough so I duplicated them with some grungepaper and some brown paint with a little dry glitter thrown in or actually on, literally.  They turned out good.

I cut the 'believe' from his script holiday words in red and then sprayed them with heirloom gold

The yellow light in the lamp post, I used some plastic packaging and covered it with some sunshine alcohol ink

So do you think the snowflakes look like they are metal?
  I covered the back of the tag with some darker tan and stamped Merry Christmas on them with a couple of smaller snowflakes and signed them.  Got them in the mail just this past Monday.  Good thing too because we had a pretty good snow storm here on Tuesday.  About 6-7" I think they said. 

Hope you are having a joyous crafting holiday season.
Hug,
~Jody

Monday, December 14, 2015

Winter Wonderland...............................better late than never

Before I begin, I would just like to say Happy Birthday to my little sister, Kelly.  She would have been 54 years old today.  She has been our guardian Angel for 34 years now. Love and miss her so much.

A few years ago, or maybe it was just last year, Tim posted an inspiration piece from one of his media team members named Emma Williams. She called it Winter Wonderland.  Well, I just got mine done.  I loved how she made the sleigh 3D and the jingle bells vintage looking.  I actually just fell in love with the whole thing and decided to make my own.

I went to Michael's and got a platform for it and so it began.  I covered it with gesso, texture paste and distress glitter to get the snowy effect.  I made up the sleigh and the 'reindeer' and got them all painted.  Then I tried to put it all together one day and realized my platform was much longer than the one Emma used.  It must have thrown me off quite a bit because I stalled out, right there, lol.  It sat on my buffet all year.  I just kept looking at it, and looking at it, every time I walked by.  It finally donned on me that I just needed to add some extra trees, like more than she had on hers.  But by then, Christmas was had long past and the passion for it had left me.

When I was putting out this year's Christmas decorations, I had to move the little platform with falling down reindeer and sleigh to another place.  Well it ended up being put IN the buffet for safe keeping.  I got all the decorations done and then one day it popped in my head that I should finish that little Winter Wonderland.  So I salvaged it from the depths of the old buffet and took it into my craft room.  I mussed and fussed with it, for most of the day, finding little trinkets and bells and things that I could decorate it with. And it is finally done, over a year later, lol.  See what you think.

The trees I used were from my little Christmas Village.  I didn't end up putting it up this year so I borrowed it's trees.

I had some little blue stars left over from a 4th of July project so I added them to my sleigh. They kinda matched the word 'JOY' since it was done in blue too.

The little snowman was from one of my tea party invitations or menu cards from years past.  It is made out of shrink plastic with one of Tim's old snowman dies.  He had a swirl of blue on him so I added him to the scene as well.
I am so pleased with how it turned out.  Glad I waited for the inspiration to return and I'm glad too that it did return.  Loved the old world feel to it.  Hope you like it too.
Hugs,
~Jody