Tuesday, August 30, 2011
Bad News-kinda
Got a bit of bad news today. My sister sent me a text this afternoon and asked me if I had heard the news about Bo? He was my ex-husband, we divorced in 2002, I think it was and I moved to Florida in 2004. I texted back that no, I hadn't, what happened? My family is always keeping me in the loop as far as my ex-husband is concerned. Not sure what that's about but whatever! Well, he passed away last Sunday, August 28th, 2011, unexpectedly the obit said. He finally met his demise. I certainly hope he can put his demons to rest now. Someone who signed his guest book, there were 4 in all, said that she hoped his illness was past him now or something like that. Ha, his illness was alcoholism and he swore he would never quit. Well, it looks like it finally did him in. Sad, what a waste. Me, I'm fine! Like my daughter stated, it's simply just fact, we have no feelings one way or the other!


Sunday, August 28, 2011
Saturday Tea Party-Stormy Sunday
Good Morning everyone! It is cloudy and rainy here in good ol' Florida this morning. Remnants of Hurricane Irene, naw, she's long gone as far as we are concerned, just a little thunder boommer moving to the east. I will say we need to pass along a few prayers for all those that did feel the rath of Hurricane Irene. So glad it didn't make land fall as a 3 or 4 storm, they are so scary. Looks like the sun may come out later so I'll just hide out in my craft room until then.
We did get to enjoy some sunshine yesterday. The tea ladies and I met for our monthly tea up at Angel's Tea Room in Dade City. What a cute, quaint little town. Soooooo many antique shops and things to look at. The tea was absolutely delightful. The two ladies that were working it did an excellent job of taking care of our every need and the food was divine. Excellent chicken salad and the scones were to die for, yum!!! Lots of food too, had to bring half of it home, but that's ok, made for a nice quick dinner.
 Oh and I made the outfit too! Doesn't look like much here but the fabric is fall leaves with specks of gold glitter throughout. It turned out really good and it fit so well, almost like it was made for me, ha!!! It was a great day, well worth the trip!!
Hope you have a great day as well,
Hugs,
~Jody
Oh and I made the outfit too! Doesn't look like much here but the fabric is fall leaves with specks of gold glitter throughout. It turned out really good and it fit so well, almost like it was made for me, ha!!! It was a great day, well worth the trip!!
Hope you have a great day as well,
Hugs,
~Jody
 Oh and I made the outfit too! Doesn't look like much here but the fabric is fall leaves with specks of gold glitter throughout. It turned out really good and it fit so well, almost like it was made for me, ha!!! It was a great day, well worth the trip!!
Hope you have a great day as well,
Hugs,
~Jody
Oh and I made the outfit too! Doesn't look like much here but the fabric is fall leaves with specks of gold glitter throughout. It turned out really good and it fit so well, almost like it was made for me, ha!!! It was a great day, well worth the trip!!
Hope you have a great day as well,
Hugs,
~Jody
Sunday, August 21, 2011
Shadow Box Card
 Hi peeps, long time no blog, I know! I had some computer issues and I finally got all those taken care of so then I was able to get back to creating, yeah! This is a shadow box card that I made for my little sister for her birthday next Sunday. I was inspired by Sari Hanninen from Sweden. I stumbled across her blog a few weeks ago and she had a whole bunch of TH (tim holtz) inspired creations and this shadow box card really caught my eye. The frame on the cover was chipboard cut with my cricut and covered with paper on either side. Then I just poked a hole in the center of it and sprayed it with water from my mini mister. This allowed the chipboard to be torn a little easier and I just kept pushing out until it looked like it was fairly even on all sides. Then I stained the white core parts with TH walnut distress stain. Added some flowers and a bow and a few buttons and a door knob, of course. And know for the inside.
The inside is the best part...................... drum roll please
Hi peeps, long time no blog, I know! I had some computer issues and I finally got all those taken care of so then I was able to get back to creating, yeah! This is a shadow box card that I made for my little sister for her birthday next Sunday. I was inspired by Sari Hanninen from Sweden. I stumbled across her blog a few weeks ago and she had a whole bunch of TH (tim holtz) inspired creations and this shadow box card really caught my eye. The frame on the cover was chipboard cut with my cricut and covered with paper on either side. Then I just poked a hole in the center of it and sprayed it with water from my mini mister. This allowed the chipboard to be torn a little easier and I just kept pushing out until it looked like it was fairly even on all sides. Then I stained the white core parts with TH walnut distress stain. Added some flowers and a bow and a few buttons and a door knob, of course. And know for the inside.
The inside is the best part...................... drum roll please
 Can you see how the right side stands out a bit? It was a bit difficult to put together but once you got the hang of it, it worked out pretty well. I just love how it looks like you are looking in say a store front window or someone's living room window, not that we would really ever do that, lol!
 I made the 'window' first, then I made a book cover so to speak and attached the window to the back cover and decorated the other side. I used some TH papers, some Heart Warming Vintage papers that I printed free off their website and some pages from an old, OLD book that I bought at a garage sale years ago. The little viles (filled with colored water) and the weathered clock on the left are TH. The other clock is CTMH with some TH arts added on and the rest is just stuff I found in my stash. I heat embossed the happy birthday with black embossing powder so it would stand out. Here's a close up of the two sides.

 I just love the way it turned out. Need to make one for myself now, ha!
Hope you have a good rest of the weekend and an even better week.
Hugs,
~Jody
I just love the way it turned out. Need to make one for myself now, ha!
Hope you have a good rest of the weekend and an even better week.
Hugs,
~Jody
Saturday, August 13, 2011
I DID IT!
Yeah!!!!!!!!!!!
I have been having computer problems for the past couple of months so I had to completely recover my system. And guess what, I must have done something right because I can get on my blog again and all those other sites that I haven't been able to access. I'm so excited!!!!
Welcome back Me!
Sunday, June 26, 2011
TH Inspired Birthday Card
Went over to Stampfest in Kissimmee this morning. Met some of my sister's friends there. My sister is home recouping from back surgery so she wasn't able to go with us. She seems to be getting around pretty good though, I guess. Anyway, was checking out all the Tim Holtz stuff, as well as the other vendors, but I had purchased a couple of dies the other day at Scraporium and wanted to give them a try. Needed a birthday card for my step-father. His birthday is next Saturday and I'm not sure how old he will be, maybe 70-71, we'll go with early 70's, how's that??
Here's the card I came up with.


 I purchased the 'old jalopy' die and the little texture fade (which I used on the inside). The jalopy I embossed with black embossing powder and then inked with vintage photo. It made it look kinda rustic. I did the accent pieces in vintage photo as well. The map I found online and inked it too to give it that aged vintage look. My folks still live in WY so that is why I used that particular map. I thought it was kinda cool. The sign I made with one of the stamp sets that I got this morning, it's called "Going Somewhere". I heat embossed the red and blue lines around it to kinda match all the lines in the map. Then I attached a key and a muse token with a pin to the sign. Thought it turned out pretty cute, hope he likes it!


 I purchased the 'old jalopy' die and the little texture fade (which I used on the inside). The jalopy I embossed with black embossing powder and then inked with vintage photo. It made it look kinda rustic. I did the accent pieces in vintage photo as well. The map I found online and inked it too to give it that aged vintage look. My folks still live in WY so that is why I used that particular map. I thought it was kinda cool. The sign I made with one of the stamp sets that I got this morning, it's called "Going Somewhere". I heat embossed the red and blue lines around it to kinda match all the lines in the map. Then I attached a key and a muse token with a pin to the sign. Thought it turned out pretty cute, hope he likes it!
Saturday, June 18, 2011
July 4th Plaque
I made this plaque for my front door inspired by Annette Green's. Mine is a bit different but I guess that is what makes the world go 'round. Her letters were a bit to big I thought or maybe just a bit too big for my piece of wood so I cut mine out of some chipboard on the Cricut. I cut four of each letter and then stacked them for some dimension. I wrapped some TH tissue tape around them to hold them together. I watered down some acrylic paint (barn red and military blue) and painted over the top. The words showed through really well so I didn't need to stamp on them. I really like how it turned out. It now adorns my front door for all who enters to see!!!


Thursday, June 2, 2011
Pennant Banner
Well, I finally had a chance to play with the new pennant dies from Spellbinders. I made this banner for my nephew's birthday. He's all boy so I tried not to make it toooo frilly. They work nicely but I have to say I was a little disappointed in the size. I thought they would be bigger than they are. Next I want to try a small one for a scrapbook layout. I need to get on my daughter's scrapbook pages anyway so maybe this will give me the push I need. Anyway, here's a couple of photos of the banner.

 It turned out pretty cute, I thought. I used some black eyelets on the top to thread the ribbon through. Got a Crop-o-dile over the weekend so gave it a pretty good workout. Hope he likes it. Happy Birthday Zachary!
Hugs,
~Jody
It turned out pretty cute, I thought. I used some black eyelets on the top to thread the ribbon through. Got a Crop-o-dile over the weekend so gave it a pretty good workout. Hope he likes it. Happy Birthday Zachary!
Hugs,
~Jody

 It turned out pretty cute, I thought. I used some black eyelets on the top to thread the ribbon through. Got a Crop-o-dile over the weekend so gave it a pretty good workout. Hope he likes it. Happy Birthday Zachary!
Hugs,
~Jody
It turned out pretty cute, I thought. I used some black eyelets on the top to thread the ribbon through. Got a Crop-o-dile over the weekend so gave it a pretty good workout. Hope he likes it. Happy Birthday Zachary!
Hugs,
~Jody
Monday, May 30, 2011
Happy Memorial Day!
I hope everyone had a wonderful Memorial Day and that we kept in mind the real reason for this holiday. Here's a really cool you-tube video a friend sent me just for the occasion: http://www.youtube.com/watch?v=rJO7lJIxG10
I spent the weekend over at my little sister's on the east coast of Florida. We just hung out, swam in their pool, drank margaritas and made some awesome Father's Day cards. It was a great weekend! Here's one of the cards that we made. It is a tool belt, how cute is that! We found the inspiration in Paper Crafts magazine from a card by Kim Kesti. We embellished upon her idea so ours turned out quite differently but Oh So CUTE. I'm sure our father will love it.

 AND,
since we have two father's, one biological and one step, we each had to make two cards. We will give the alternate one to the other father, how cool is that, lol!!! Here's the other card. It was made out of a brown paper lunch sack. We got the inspiration from my little sister's friend and CTMH consultant, Annette Green. She is so handy, I tell ya!
AND,
since we have two father's, one biological and one step, we each had to make two cards. We will give the alternate one to the other father, how cool is that, lol!!! Here's the other card. It was made out of a brown paper lunch sack. We got the inspiration from my little sister's friend and CTMH consultant, Annette Green. She is so handy, I tell ya!

 We had so much fun making these two cards. Now I'm already for Father's Day, three weeks early, don't think that's ever happened, lol!
Hope ya'all made it home safely from your holiday weekend adventure.
Hugs,
~Jody
We had so much fun making these two cards. Now I'm already for Father's Day, three weeks early, don't think that's ever happened, lol!
Hope ya'all made it home safely from your holiday weekend adventure.
Hugs,
~Jody

 AND,
since we have two father's, one biological and one step, we each had to make two cards. We will give the alternate one to the other father, how cool is that, lol!!! Here's the other card. It was made out of a brown paper lunch sack. We got the inspiration from my little sister's friend and CTMH consultant, Annette Green. She is so handy, I tell ya!
AND,
since we have two father's, one biological and one step, we each had to make two cards. We will give the alternate one to the other father, how cool is that, lol!!! Here's the other card. It was made out of a brown paper lunch sack. We got the inspiration from my little sister's friend and CTMH consultant, Annette Green. She is so handy, I tell ya!

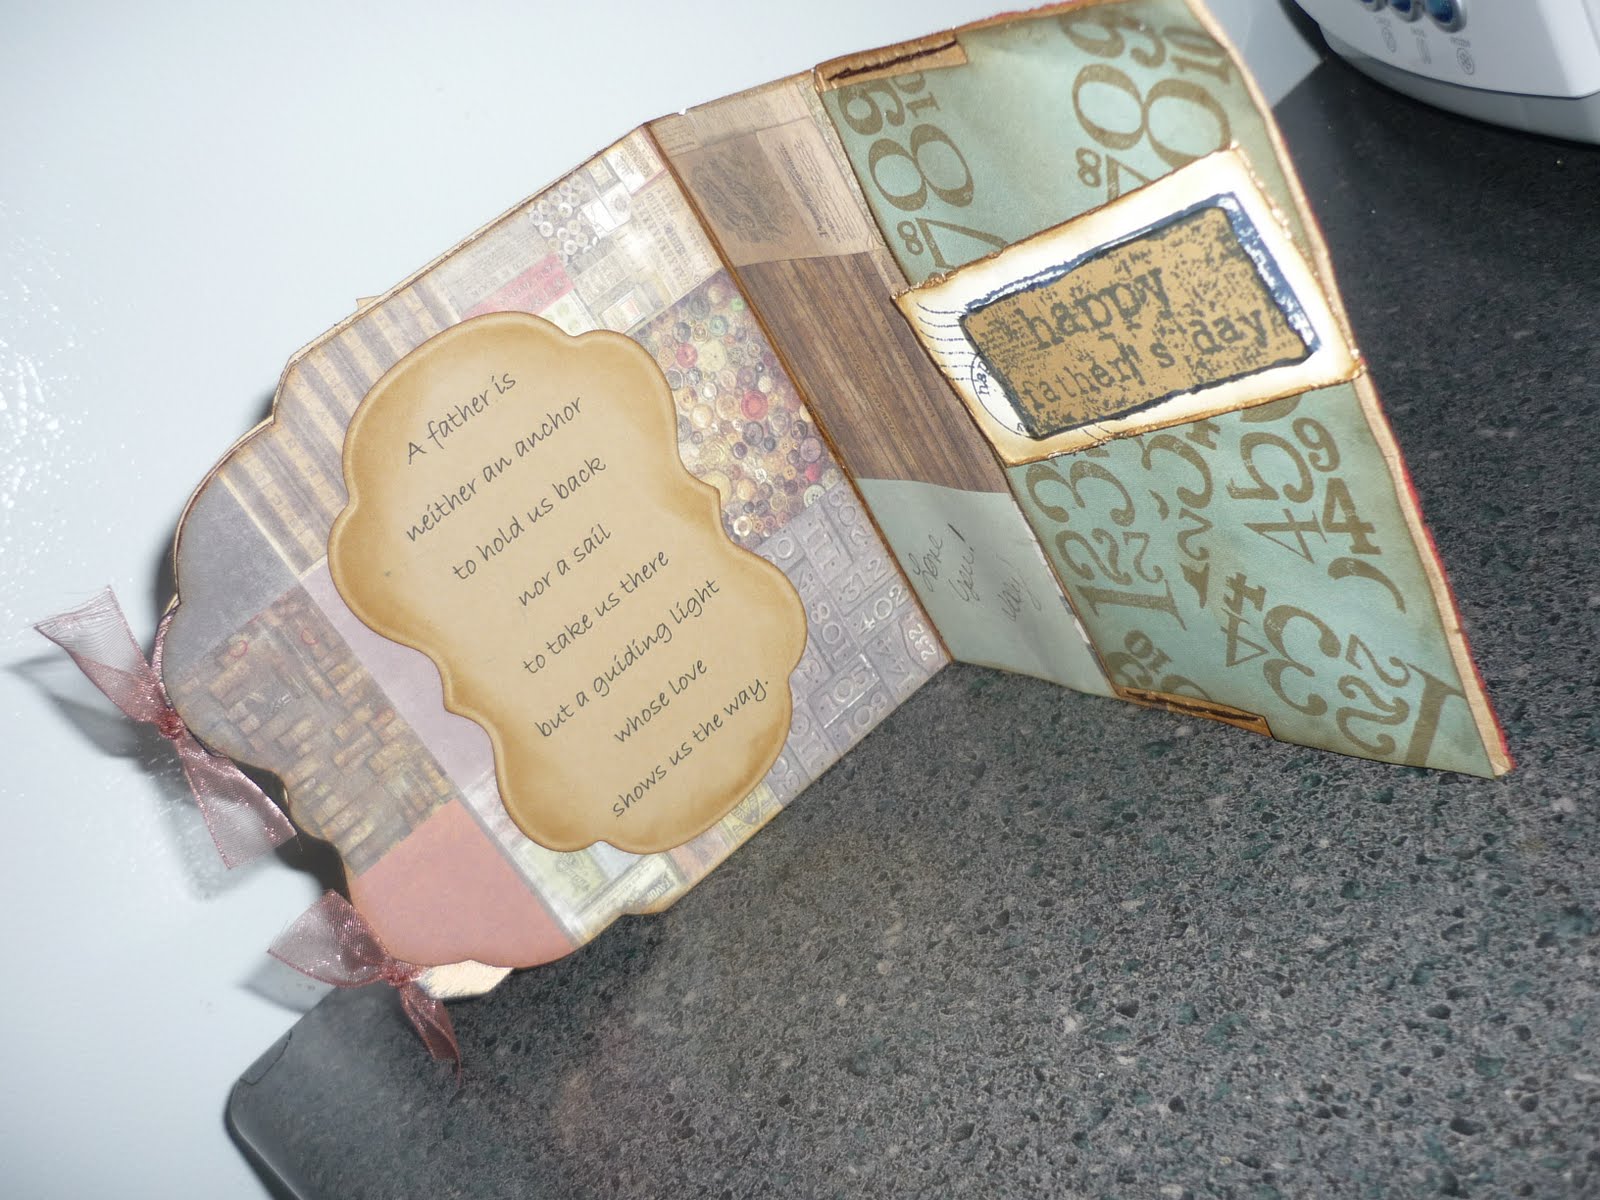 We had so much fun making these two cards. Now I'm already for Father's Day, three weeks early, don't think that's ever happened, lol!
Hope ya'all made it home safely from your holiday weekend adventure.
Hugs,
~Jody
We had so much fun making these two cards. Now I'm already for Father's Day, three weeks early, don't think that's ever happened, lol!
Hope ya'all made it home safely from your holiday weekend adventure.
Hugs,
~Jody
Sunday, May 22, 2011
Scrapbooking. . . . . . . .Is Cheaper Than Therapy
Good afternoon peeps. My little sister was here for the weekend, birthday celebrations ya know. I turned another year older on Friday so she came over and we did some scrapbooking and ate lobster and chocolate and monkey bread (I call it sticky buns but ....) and brownies, lol. I think we ate more than we did anything. Even had fresh homemade eggs benedict for breakfast before she left this morning.
ANYWAY, what I wanted to share with you was a sign I made this morning after she left. I had started it before because I was thinking I would need her help but I was able to do it myself so.........
A couple of years ago, my daughter Miranda, gave me a vinyl sign that says "scrapbooking...is cheaper than therapy". It was one of those that you put directly on the wall. Well, I live in an apartment so I didn't want to put it directly on the wall so I was always going to get a piece of canvas and put it on there and then hang it on the wall. Well, I finally did it. It looks pretty good to, if I don't say so myself. And if I ever move again, I can take it with me and put it in my new craft room, lol!!!!!


Saturday, May 21, 2011
Waltzingmouse Stamps Challenge
I just love that little tea bag template. It makes up so cute. This is one I did for the challenge over at Waltzingmouse Stamps. They are having their 2nd anniversary. Claire is having a little party and she invited us to show off some our creativity.
 I used my new Cricut Expression to make the little tea pot. It turned out so cure. Hope you like it. Thanks for stopping by.
Hugs,
~Jody
I used my new Cricut Expression to make the little tea pot. It turned out so cure. Hope you like it. Thanks for stopping by.
Hugs,
~Jody
 I used my new Cricut Expression to make the little tea pot. It turned out so cure. Hope you like it. Thanks for stopping by.
Hugs,
~Jody
I used my new Cricut Expression to make the little tea pot. It turned out so cure. Hope you like it. Thanks for stopping by.
Hugs,
~Jody
About Me

- Jody
- Good Morning, thanks for stopping by, glad you could make it!! I am currently in Cheyenne, WY which is where I moved to from Tampa, FL about 18 months ago. I am an Accounts Payable Specialist and have been in the accounting field for several years. I have been papercrafting for about 11 years now and I love it, especially the vintage style. I have branched out to doing mixed media and jewelry this past few years. Glad you could join me on this exciting adventure! Hugs!!!


Thanks for stopping by
